How to Register a New Patient Accurately on AfyaWingu | Step-by-Step Guide
Mastering Patient Registration on AfyaWingu: Accuracy from the Start
Accurate patient registration isn’t just administrative work—it’s the cornerstone of safe, efficient, and compliant healthcare delivery. At AfyaWingu, we’ve designed our “Add Patient” form to be intuitive, thorough, and aligned with real-world clinical workflows. Getting this step right ensures correct patient identification, seamless data management, and regulatory compliance across your facility.
In this quick guide, we’ll walk you through registering a new patient on AfyaWingu—step by step.
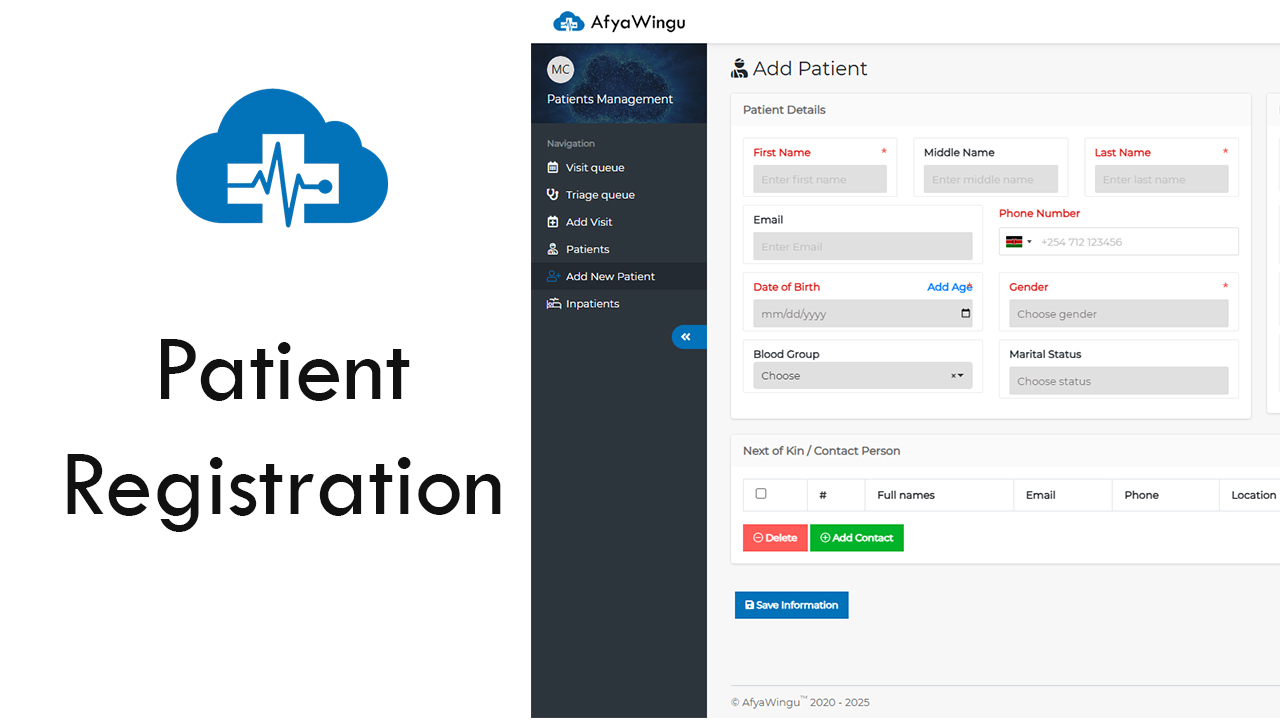
Step 1: Fill in Patient Details (Left Panel)
Begin with the Patient Details section on the left-hand side of the form. Mandatory fields are clearly marked with a red asterisk (*)—these must be completed before you can save.
- First Name: Enter the patient’s first name in the “Enter first name” box.
- Middle Name: Optional, but recommended if it helps distinguish the patient.
- Last Name: A required field—ensure it matches official documentation.
- Email: Add the patient’s email address if available—it aids in communication and follow-ups.
- Phone Number: Enter the full number, including the country code (e.g., +254 for Kenya).
Next, move to demographic fields:
-Date of Birth: Use the mm/dd/yyyy format.
→ Want to auto-calculate age? Simply click the blue “Add Age” link next to the field—the system will instantly populate the patient’s age.
- Gender: Select from the dropdown menu (required).
- Blood Group: Choose the appropriate blood type from the dropdown.
Step 2: Enter Additional Key Information (Right Panel)
Switch to the right side of the form for more critical identifiers:
- Identification Type: Choose from options like National ID, Passport, Birth Certificate, etc.
- Identification Number: Enter the corresponding ID number (e.g., National ID).
- Occupation: Helps contextualize care and social determinants of health.
- Religion: Optional but valuable for culturally sensitive care planning.
- Patient Status: Defaults to “Alive”—update only if necessary.
- Referral Patient?: Select “Yes” if applicable—this will reveal additional fields below.
Step 3: Complete Referral Information (If Applicable)
If you’ve marked the patient as a referral, fill in the following:
- Referral Hospital: Name of the referring facility.
- Referral Doctor: Full name of the referring clinician.
- Referral Number: Any official reference or case ID.
- Referral Note: Use this free-text box for clinical notes or special instructions.
Step 4: Add a Next of Kin or Emergency Contact
Click the green “Add Contact” button to open a contact table. Here, you can record:
- Full Name
- Phone Number
- Location
- National ID
- Gender
- Relationship (e.g., spouse, parent, sibling)
This information is vital for emergency communication and continuity of care.
Step 5: Save the Record
Once all required fields are complete, scroll to the bottom and click the bold blue “Save Information” button.
That’s it! The patient is now officially registered in your AfyaWingu system—ready for appointments, consultations, prescriptions, and ongoing care.
Why It Matters
Every detail you enter at registration ripples through the entire care journey. With AfyaWingu, you’re not just filling forms—you’re building a reliable, auditable, and patient-centered health record from day one.
Fast. Accurate. Built for the realities of African healthcare.
Welcome to smarter patient registration—powered by AfyaWingu.